
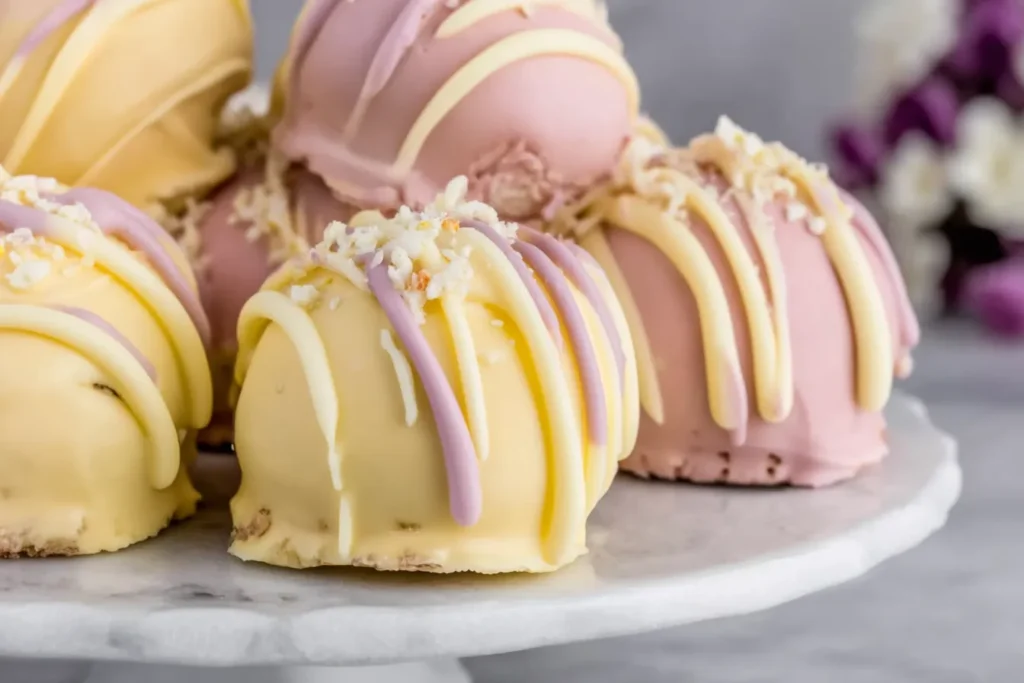
If you’re looking for a festive dessert that feels special without turning your kitchen into chaos, these Banana Pudding Easter Truffles are about to become your new best friend. Think creamy banana pudding meets sweet vanilla wafers, all wrapped in a dreamy chocolate shell—yes, it’s as good as it sounds.
I love recipes like this because they hit that sweet spot: easy enough for a busy weeknight, but cute and colorful enough to steal the show at your Easter gathering. And honestly? Anything you can roll, dip, and decorate counts as a little edible therapy in my book.
Let’s dive in—because these little bites of joy don’t make themselves (sadly 😉).
Why You’ll Love These Banana Pudding Easter Truffles
There’s something magical about Banana Pudding Easter Truffles—they’re nostalgic, playful, and ridiculously simple.
- No baking required (your oven gets a day off 🙌)
- Kid-friendly and fun to decorate
- Perfect for gifting or Easter dessert tables
- Creamy, sweet, and packed with banana flavor
- Make-ahead friendly (a lifesaver when life gets busy)
If you’ve ever made classic banana pudding, this is like its adorable, party-ready cousin.
Ingredients You’ll Need
Here’s everything that goes into these sweet little bites:
- 2 cups crushed vanilla wafers
- 1/2 cup cream cheese (softened)
- 1 package (3.4 oz) banana pudding mix (dry)
- 2 tablespoons milk
- 1 teaspoon vanilla extract
- 2 cups white chocolate chips or candy melts
- Food coloring (pastel colors for Easter vibes)
- Extra crushed vanilla wafers (for topping)
- Easter sprinkles
- Colored chocolate drizzle
Quick tip: If your cream cheese isn’t soft enough, you’ll end up wrestling your mixing bowl—and nobody has time for that.
Step-by-Step: How to Make Banana Pudding Easter Truffles
1. Make the Filling
In a large bowl, mix:
- Crushed vanilla wafers
- Softened cream cheese
- Banana pudding mix (dry)
- Milk
- Vanilla extract
Stir until everything comes together into a soft dough. It should be thick enough to roll but still slightly creamy.
👉 If it feels too sticky, add a little more crushed wafers. Too dry? A splash of milk will fix it right up.
2. Shape the Truffles
Roll the mixture into 1-inch balls and place them on a parchment-lined baking sheet.
Pop them in the fridge for 30–45 minutes.
This step is key—chilled truffles are much easier to dip and hold their shape better. (Trust me, skipping this leads to melty chaos.)
3. Melt the Chocolate
Microwave your white chocolate in 30-second intervals, stirring each time until smooth.
Add a few drops of pastel food coloring if you want that classic Easter look—think soft pinks, yellows, and blues.
4. Coat the Truffles
Using a fork or dipping tool, coat each chilled truffle in the melted chocolate.
Let the excess drip off before placing them back on the parchment paper.
No need for perfection here—those little drips and swirls add character!
5. Decorate and Set
Before the coating hardens, sprinkle on:
- Crushed vanilla wafers
- Easter sprinkles
- Chocolate drizzle
Let them set for 15–20 minutes until firm.
Then step back and admire your work—because these are cute.
Simple Tips for Perfect Truffles
Let’s keep things stress-free with a few helpful tricks:
- Work in batches: Keep some truffles in the fridge while you dip others.
- Use a fork for dipping: It makes life so much easier (and less messy).
- Thin your chocolate if needed: A tiny bit of coconut oil can help smooth it out.
- Don’t overthink decorating: Even a simple sprinkle looks festive and fun.
And if your chocolate coating isn’t perfectly smooth? Call it “rustic charm” and move on. 😉
A Little Kitchen Story
The first time I made these Banana Pudding Easter Truffles, it was one of those weeks—you know, the kind where your to-do list seems to multiply overnight.
I needed something quick for a family get-together but still wanted that “wow” factor. These truffles saved me. Not only were they easy, but everyone thought I spent hours making them.
(If only they knew I made them in between laundry loads and answering emails.)
That’s the beauty of simple recipes—they show up for you when you need them most.
FAQs About Banana Pudding Easter Truffles
Can I make Banana Pudding Easter Truffles ahead of time?
Absolutely! You can make them 2–3 days in advance and store them in the fridge. Just keep them in an airtight container.
How should I store leftovers?
Store your Banana Pudding Easter Truffles in the refrigerator for up to 5 days. They taste even better chilled!
Can I freeze these truffles?
Yes! Freeze them in a single layer, then transfer to a container. They’ll last up to 2 months. Thaw in the fridge before serving.
Can I use a different coating?
Of course. While white chocolate gives that Easter look, you can use:
Milk chocolate
Dark chocolate
Even colored candy melts
What if I don’t have vanilla wafers?
You can swap them with:
Graham crackers
Shortbread cookies
The flavor will change slightly, but it’ll still be delicious.
Bringing It All Together
A Sweet Easter Treat to Remember
There’s just something about Banana Pudding Easter Truffles that feels like a little bite of happiness. Maybe it’s the creamy banana flavor, or maybe it’s how fun they are to decorate—but either way, they bring smiles every single time.
Whether you’re making these for your kids, your friends, or just yourself after a long day (no judgment here), this recipe is one you’ll come back to again and again.
So grab those vanilla wafers, melt that chocolate, and let your kitchen smell like a cozy, sweet celebration. Because honestly? We all deserve a treat that’s this easy and this delightful. 💛
More Easy Favorites You’ll Want to Try
If you’re anything like me, once you find a simple, delicious recipe that works, you’re already thinking about what to make next. And if you want to see another fun take on this treat, you can check out these banana pudding Easter truffles for extra inspiration. Here are a few more cozy, crowd-pleasing ideas to keep that same easy, joyful cooking rhythm going:
- For another sweet treat with a fresh twist, try these bright and zesty Key Lime Truffles—they’re just as fun to make and perfect for sharing.
- When dinner needs to be effortless but still comforting, this no-fuss slow cooker honey garlic chicken comes to the rescue every time.
- Want something light and fresh to balance out the sweets? This flavorful orzo pasta salad fits beautifully into any meal.
- And for those slow mornings or special weekends, these soft pistachio cream cinnamon rolls bring that bakery-style comfort right into your kitchen.
A little mix of sweet and savory keeps things fun—and makes every day in the kitchen feel just a bit more special.
Print
Banana Pudding Easter Truffles
- Total Time: 25 minutes
- Yield: 20 truffles 1x
Description
Banana Pudding Easter Truffles are a creamy, no-bake dessert made with vanilla wafers, banana pudding, and cream cheese, coated in pastel chocolate. These bite-sized treats are perfect for Easter celebrations, gifting, or a fun family activity.
Ingredients
- 2 cups crushed vanilla wafers
- 1/2 cup cream cheese (softened)
- 1 package (3.4 oz) banana pudding mix (dry)
- 2 tablespoons milk
- 1 teaspoon vanilla extract
- 2 cups white chocolate chips or candy melts
- Food coloring (pastel colors)
- Crushed vanilla wafers (for topping)
- Easter sprinkles
- Colored chocolate drizzle
Instructions
Make the Filling:
Mix crushed vanilla wafers, cream cheese, banana pudding mix, milk, and vanilla extract until a soft dough forms.Shape the Truffles:
Roll into 1-inch balls and place on a parchment-lined baking sheet. Chill for 30–45 minutes.Melt the Chocolate:
Microwave white chocolate in 30-second intervals, stirring until smooth. Add pastel food coloring if desired.Coat the Truffles:
Dip chilled truffles into melted chocolate and let excess drip off.Decorate:
Top with crushed wafers, sprinkles, or drizzle before coating sets.Set and Serve:
Let truffles set for 15–20 minutes until firm. Serve and enjoy!
Notes
- Chill the truffles well before dipping to prevent melting.
- Add a teaspoon of coconut oil to chocolate if it’s too thick.
- Store in the refrigerator for best texture and flavor.
- Perfect for make-ahead desserts and holiday trays.
- Prep Time: 20 minutes
- Cook Time: 5 minutes
- Category: Dessert
- Method: No-Bake
- Cuisine: American
Nutrition
- Serving Size: 1 truffle
- Calories: 120
- Sugar: 10 g
- Sodium: 60 mg
- Fat: 7 g
- Saturated Fat: 4 g
- Unsaturated Fat: 2 g
- Trans Fat: 0 g
- Carbohydrates: 14 g
- Fiber: 0 g
- Protein: 1 g
- Cholesterol: 10 mg