
If you’ve ever dreamed of making a gingerbread house without the measuring, mixing, baking, and inevitable collapse that feels like a personal attack… let me introduce you to the magic of the Pop Tart Gingerbread House. This adorable little creation has become one of my go-to holiday projects, especially when life gets busy (which, let’s be honest, is every December).
As a busy mom and comfort-food lover, I’m all about choosing joy over stress in the kitchen. And this? This is joy wrapped in frosting. A Pop Tart Gingerbread House gives you that festive “holiday-movie kitchen moment” without asking for hours of your day or a degree in structural engineering. If you’ve got Pop Tarts, icing, and a handful of Christmas candy, you’re halfway there.
This mini house makes the perfect weekend activity with kids, a charming edible centerpiece, or—my personal favorite—a cozy self-care craft paired with hot chocolate after a long week.
Table of Contents
Why You’ll Love This Pop Tart Gingerbread House
There are a lot of reasons to fall for this cheerful little project, but here are the highlights:
- No baking required. Truly. Zero. Your oven gets the day off.
- Kid-friendly and mom-sanity-friendly. Pop Tarts are sturdy, sweet, and way less fragile than traditional gingerbread panels.
- Uses inexpensive ingredients. Strawberry Pop Tarts? Check. One tube of icing? Easy. Christmas candy? Whatever you have in the pantry.
- It comes together fast. Think 20 minutes of hands-on time instead of an entire afternoon.
- It smells like childhood happiness. Strawberry frosting and sugary icing? Yes, please.
This isn’t just a recipe—it’s a low-stress tradition waiting to happen.
Ingredients for Your Pop Tart Gingerbread House
- 6 Strawberry Pop Tarts
- 1 tube decorating icing (your glue and your best friend today)
- Christmas candy (whatever makes your heart sparkle)
Tip: If you want a snowy look, pick white icing and candies like peppermints, gumdrops, mini marshmallows, or those little round sprinkles that roll everywhere no matter how careful you are. It’s part of the fun… supposedly.
How to Make a Pop Tart Gingerbread House
Let’s break this down into simple steps so even the most holiday-frazzled among us can enjoy it. No perfection required—just a sense of fun.
1. Set Up Your Workspace
Lay down a piece of parchment paper. This not only keeps your counters clean, but also makes it easy to move your finished house without it sticking like holiday joy permanently glued to your kitchen.
2. Build the Front and Back Walls
Place one Pop Tart vertically in front of you. This will become the main front panel of your house.
Then place a second and third Pop Tart horizontally—one to the left, one to the right—lining their bottoms up perfectly with the center Pop Tart.
You’re creating a sort of “T” shape with the three pieces.
3. Create the Roof Peak
Now for the part that sounds tricky but really isn’t.
Use a knife to find the center of the top edge of your vertical Pop Tart. Make a cut from that point down at an angle to meet the tops of the side Pop Tarts. These angled cuts create the classic little triangle peak you see on gingerbread houses.
No geometry degree needed—just eyeball it. Holiday crafts don’t judge you.
4. Duplicate the Peak for the Back Wall
Lay the angled Pop Tart piece you just cut over the fourth Pop Tart.
Use it as a guide so your back wall matches the front wall.
Cut along the same angles. Boom—two matching gables.
5. Assemble the House Structure
Reposition your pieces so they form four walls, with the pointed Pop Tarts at the front and back.
Grab your decorating icing and start “gluing” the edges together.
Hold them for a few seconds so the icing starts to set.
Once the walls are standing securely (mini applause encouraged), add icing to the top edges and gently place the remaining two Pop Tarts like a roof.
Let everything firm up for a few minutes. Sip cocoa. Admire your craftsmanship.
6. Decorate Your Pop Tart Gingerbread House
Once the icing feels set, it’s time for the fun part—candy decorating!
Use the icing to attach Christmas candy wherever your heart desires:
- Peppermint “wreaths”
- Gumdrop roof shingles
- Candy cane walkway
- Mini marshmallow snowdrifts
This is where kids go wild and adults suddenly remember how fun being creative can be. There are no wrong choices—only delicious ones.
Tips for the Best Pop Tart Gingerbread House
Use these simple tricks to keep your holiday craft merry, bright, and structurally sound:
- Sturdier Pop Tarts build a sturdier house. Avoid any that feel cracked in the package. Save those for snacking.
- If icing feels too thick, warm it. Hold the tube in your hands for a minute. Body heat = smoother decorating.
- Let each step dry before adding the next. Think of icing as cement: it needs a moment to settle.
- Want a snowy look? Add powdered sugar with a sifter or a (clean!) tea strainer. Instant winter wonderland.
- Lean it against something while drying if needed. No shame in giving your house a little support—holiday miracles come in many forms.

A Little Story From My Kitchen
The first time I made a Pop Tart Gingerbread House, it was during one of those weeks where everything on my to-do list felt like it had its own to-do list. I needed a moment of calm, something fun, something creative—but definitely nothing complicated.
My daughter joined me, and before I knew it, we were laughing over crooked icing lines and a gumdrop that refused to stay put. By the time we finished, our little Pop Tart house looked like it had survived a snowstorm and a sugar explosion… but it was perfect. Imperfectly perfect. And honestly? It made that hectic week feel a little lighter. That’s the magic of simple, joyful kitchen moments.
FAQs About Making a Pop Tart Gingerbread House
Can I use a different Pop Tart flavor?
Absolutely. While strawberry gives that classic gingerbread-house color, feel free to try cookies & cream, brown sugar cinnamon, or any festive flavor you love.
How long will a Pop Tart Gingerbread House last?
If you’re not eating it (and many don’t), it can sit out for several days as a decoration. Just keep it somewhere cool and dry.
Can kids make this on their own?
Yes, with supervision for the cutting step. Once the angled pieces are done, kids can take over the entire build and decorating process.
What icing works best?
A tube of decorating icing gives great control and dries quickly. Royal icing also works if you want an extra-firm “glue.”
Can I make this ahead of time?
Definitely! Build it the night before so everything dries, then decorate the next day.
Bring the Holiday Magic Home
A Pop Tart Gingerbread House is one of those delightfully simple traditions that brings big joy without demanding big time. Whether you’re crafting with kids, decorating for a party, or treating yourself to a cozy night in, this sweet little project will brighten your season in the most charming way.
Now grab your Pop Tarts, icing, and that candy stash you hide from the kids (don’t worry—I won’t tell). Your festive masterpiece awaits!
More Festive Treats You’ll Love
If you had fun crafting your Pop Tart Gingerbread House, you’re going to adore these other holiday favorites! They’re cozy, colorful, and just as easy to make—perfect for family nights, classroom parties, or anytime you’re craving a little Christmas joy in the kitchen.
- Bring even more cheer to your dessert table with this festive and colorful Grinch Dip — creamy, fun, and always a hit at holiday gatherings.
- If you love no-fuss sweets, this quick and dreamy No-Bake Grinch Pie is the perfect follow-up treat. It’s bright, smooth, and ridiculously simple.
- For something warm, spiced, and irresistibly soft, try these chewy Gingerbread Bars. They’re everything you adore about gingerbread—without the rolling and cutting.
- And if you’re in the mood for something extra decadent, this creamy layered Christmas Cookie Lasagna is guaranteed to wow both kids and adults.
Feel free to explore these delicious ideas and keep the holiday magic going—your kitchen is about to smell amazing!
Print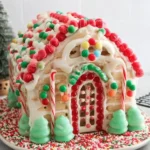
Pop Tart Gingerbread House
- Total Time: 20 minutes
- Yield: 1 gingerbread house 1x
Description
This fun and festive Pop Tart Gingerbread House is the easiest holiday craft you’ll make this season! Using just Pop Tarts, icing, and Christmas candy, you can build a colorful and charming edible centerpiece in minutes—perfect for kids, families, and anyone craving a no-fuss holiday project.
Ingredients
6 Strawberry Pop Tarts
1 tube decorating icing
Christmas candy (gumdrops, sprinkles, candy canes, etc.)
Instructions
Lay out a piece of parchment paper to create your workspace.
Place 1 Pop Tart vertically in front of you.
Place two Pop Tarts horizontally—one to the left and one to the right—lining up their bottom edges with the vertical Pop Tart.
Find the center of the top edge of the vertical Pop Tart and cut downward at angles to meet the tops of the two horizontal Pop Tarts, creating a roof peak.
Use this cut piece as a guide to cut the same angles on a fourth Pop Tart for the back wall.
Reposition all Pop Tarts to form the house structure, placing the pointed pieces in front and back.
Use decorating icing to “glue” the walls together. Hold for a few seconds until they begin to set.
Add icing to the top edges and place the remaining two Pop Tarts as the roof.
Once the structure has dried, use icing to attach Christmas candy and decorate as desired.
Notes
For extra stability, let the icing dry for 10–15 minutes between major assembly steps.
Any Pop Tart flavor can work—choose festive colors or your favorites!
Kids can decorate once the cutting step is complete.
- Prep Time: 20 minutes
- Cook Time: 0 minutes
- Category: Dessert / Holiday Craft
- Method: No Bake
- Cuisine: American